Project management is the methodical planning, carrying out, and overseeing of tasks, materials, and deadlines in order to accomplish particular goals within a predetermined scope. Once logged in, they will have access to the dashboard's homepage.

Create Project
In order to create Project Record, Navigate to the Project Management section in the system's menu.
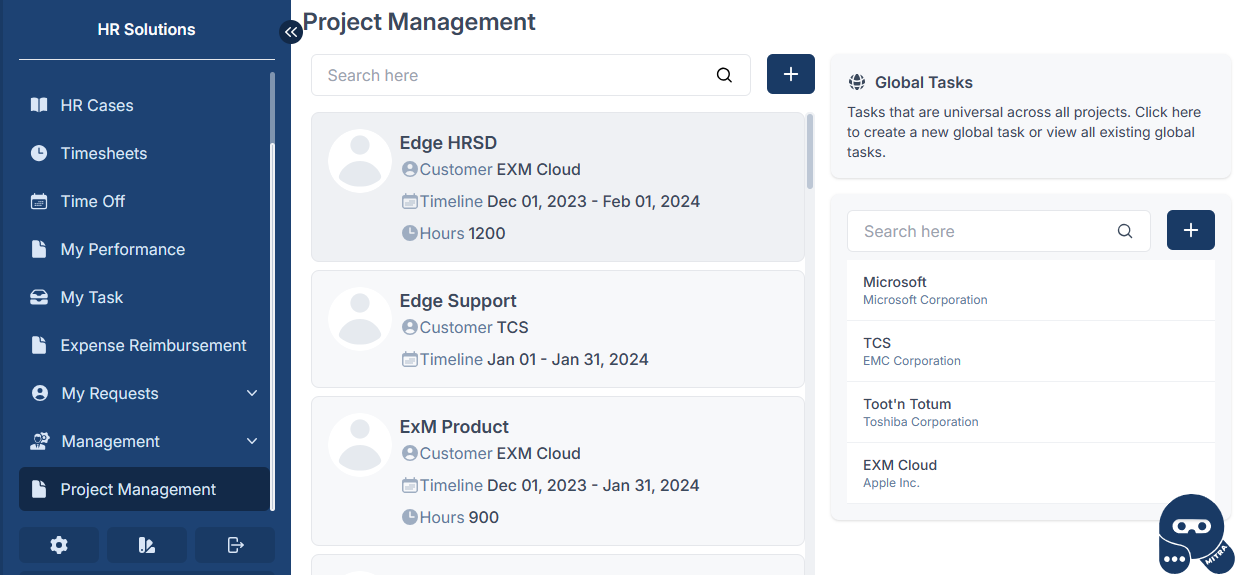
Click on the  icon button that located at the top of the page to initiate the project creation process. Upon clicking, a pop-up window will appear, providing a user interface for entering project details.
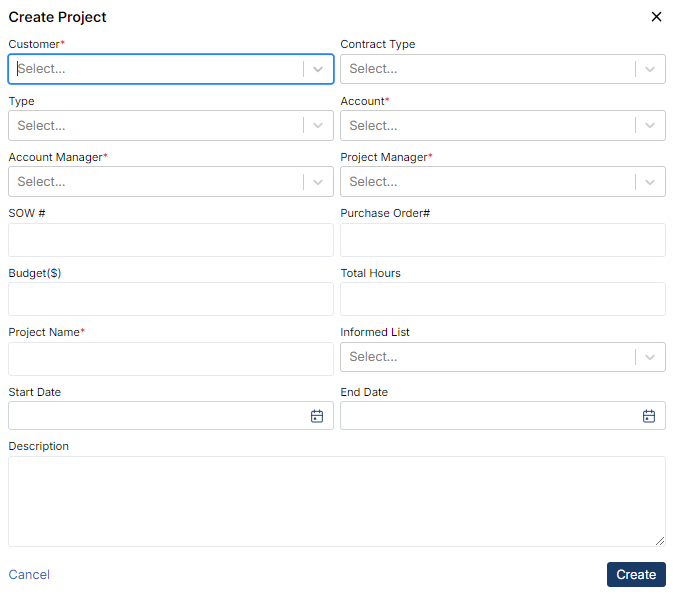
In the pop-up window, you will find the following fields to fill out: After filling in the required details, click on the "Create" button to create the project.
| Fields | Description |
|---|---|
| Customer | Identifies the client or customer for whom the project is being undertaken. |
| Contract Type | Describes the type of contract governing the project. |
| Type | Specifies the category or nature of the project. |
| Account | Indicates the account responsible for he project. |
| Account Manager | Identifies the individual responsible for managing the account associated with the project. |
| Project Manager | Specifies the person assigned to lead and oversee the project. |
| SOW# | Includes the statement of work number associated with the project |
| Purchase Order# | Includes the purchase order number associated with the project. |
| Budget | Specifies the allocated budget for the project. |
| Total Hours | Indicates the total work hours for the project. |
| Project Name | Provides a unique and descriptive name for the project. |
| Informed list | Lists individuals who need to be informed about project updates or decisions. |
| Start Date | Specifies the planned start date of the project. |
| End Date | Specifies the planned end date of the project. |
| Description | Provides a brief overview or summary of the project. |
These fields are required and must be populated: Customer, Account, Account Manager, Project Manager, and Project Name.
- Project Name cannot be duplicated.
- The End Date should be greater than the Start Date.
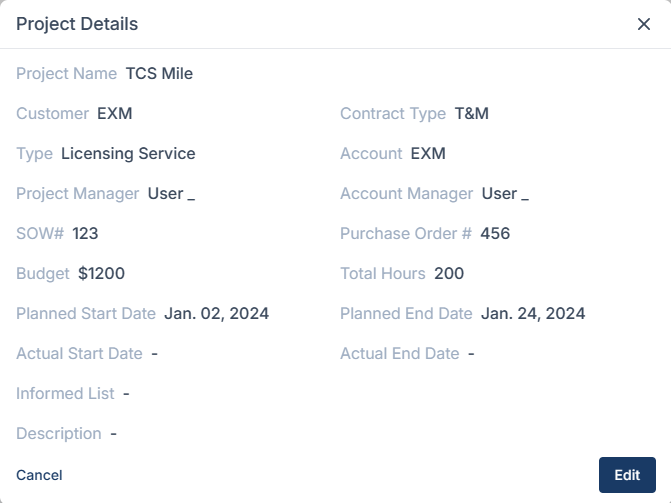
Project Details
This process allows users to easily access and modify project details, including the actual start and end dates, ensuring that project information remains accurate and reflective of the project's current status.
Navigate to the "Project Detail" in the project management interface. The Project Detail page displays comprehensive information about the project.
Click on the "Edit" button to initiate the editing process. Within the edit page, users can input the actual start and end dates of the project. After making the necessary updates, click on the "Save" button to apply the changes.
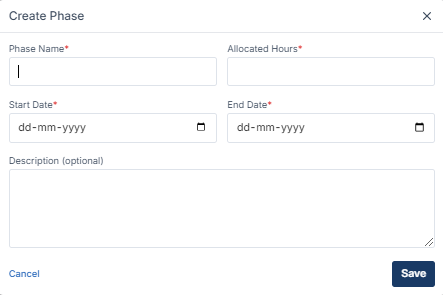
Create New Phase
The "Create New Phase" in project management refers to the initial stage of a project where key activities such as project initiation, planning, and organization take place. This phase typically involves defining project objectives, and laying the groundwork for subsequent project activities.
| Fields | Description |
|---|---|
| Phase Name | This field indicates the name or title assigned to the Create Phase of the project. |
| Allocated Hours | Specifies the total number of hours allocated for activities within the Create Phase. |
| Start Date | Indicates the start date of the Create Phase. |
| End Date | Specifies the end date of the Create Phase. |
| Description | Provides a brief overview or summary of the objectives and activities planned for the Phase. |
These fields are required and must be populated: Phase Name, Allocated Hours, Start Date and End Date.
- The start and end dates of the phase should be between the project start and end dates.
- The end date should be greater than the start date.
- The total phase hours must not exceed the allocated hours for the project.
- The phase name cannot be duplicated.
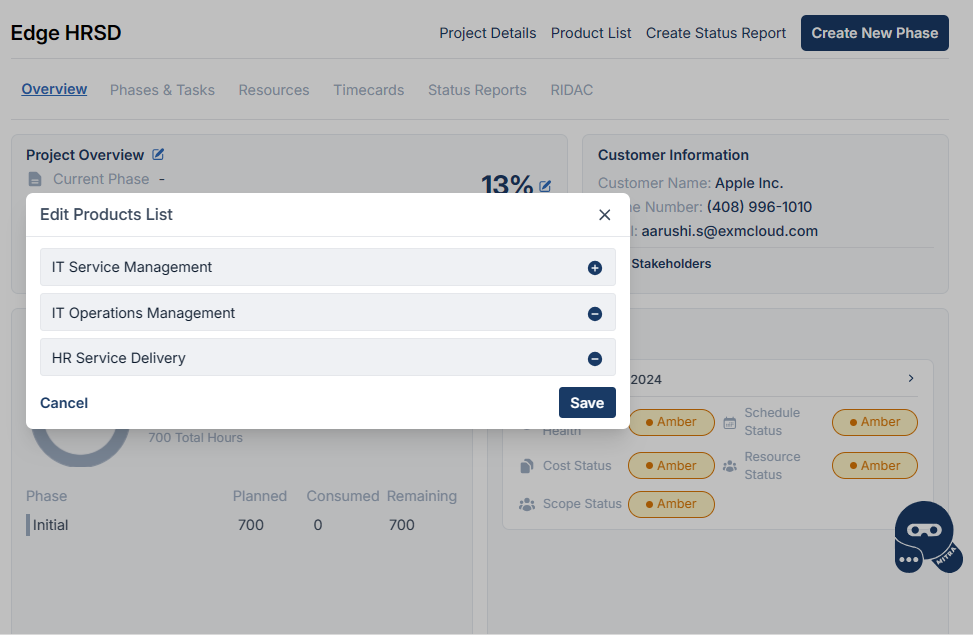
Product List
This section displays a list of products associated with the project.
To create a product list, please follow the steps below:
- Navigate to the Product List option in the project management interface.
- Click on the "Product List" option, triggering a pop-up window to appear. Within the pop-up, click on the "Edit" option to make modifications to the existing product list.
- Upon clicking "Edit," a comprehensive list of existing products associated with the project will be displayed.
- To add a new product to the project, click on the plus icon within the product list pop-up. After adding the new product, click on the "Save" button and save the changes made to the product list.
Create Status Report
The project manager's status report serves as a comprehensive overview of the project's current standing. In this report, key accomplishments are highlighted, showcasing major achievements attained since the previous update. The status of current milestones is outlined, providing stakeholders with a clear understanding of the project's progress. Additionally, upcoming milestones are discussed to give insight into the project's immediate future.
A critical component of the status report is the identification of issues, risks, and challenges that may impact the project. This section allows stakeholders to be informed of potential hurdles and provides an opportunity for proactive problem-solving. Resource allocation and budget status are also detailed, ensuring that stakeholders are aware of the project's financial health and the sufficiency of available resources.
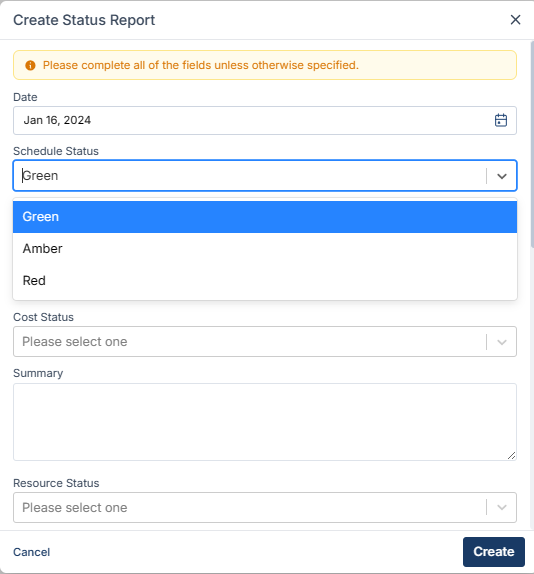
| Fields | Description |
|---|---|
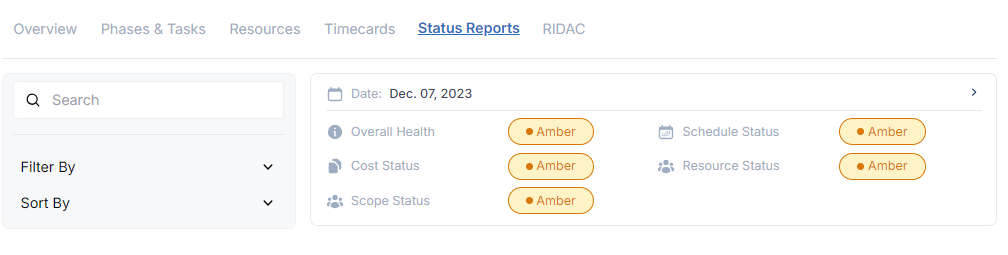
| Date | Specify the date for the status report. |
| Schedule Status | Indicate the schedule status for the status report. |
| Summary | Provide the summary for the schedule status in the status report. |
| Cost Status | Indicate the cost status for the status report. |
| Summary | Provide a summary for the cost status in the status report. |
| Resource Status | Provide information on the resource status for the status report. |
| Summary | Specify the summary for the Resource Status for the status report. |
| Scope Status | Outline the summary for the resource status in the status report. |
| Summary | Define the summary for the status of the project scope in the status report. |
| Project Status | Based on the status of Schedule, Cost, Resources, and Scope, the project status will be determined. The overall project status will be marked as 'green' only when all individual statuses are 'green'. |
| Summary | Define the summary for the overall project status in the status report. |
| Accomplishments | Detail the achievements or accomplishments in the status report. |
| Planned Activities | Outline the planned activities to be included in the status report. |
All fields visible in the form are required and must be filled.
Tabs
Description: The tabs section includes tabs for different aspects of the project.
Functionality: Project Manager can navigate between tabs to access specific details and functionalities related to Phases & Tasks, resources, status reports, RIDAC (Risks, Issues, Decisions, Actions, Changes), and a holistic Project Overview.
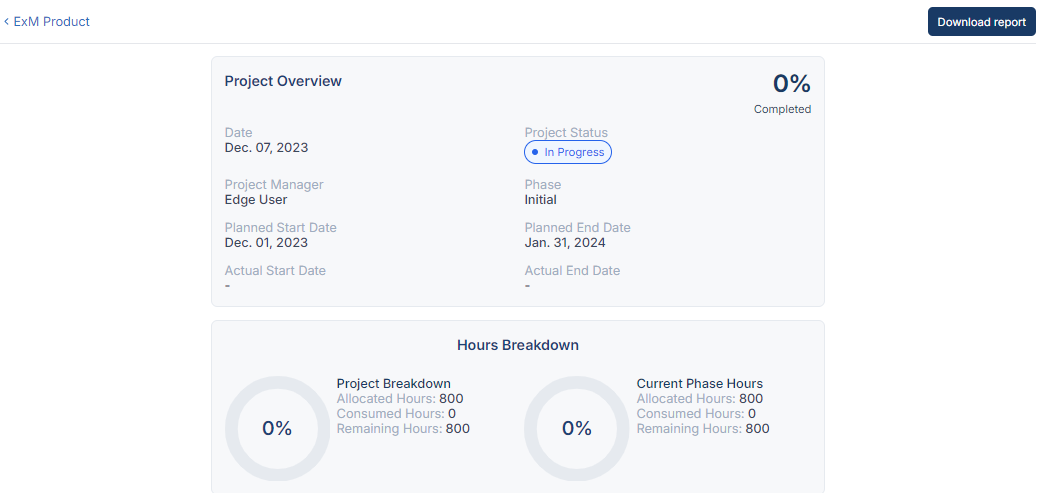
Phases & Tasks
Phases offer a high-level organizational structure, while tasks represent the detailed actions necessary for successful project completion. Together, they form the foundation for effective project planning and execution.
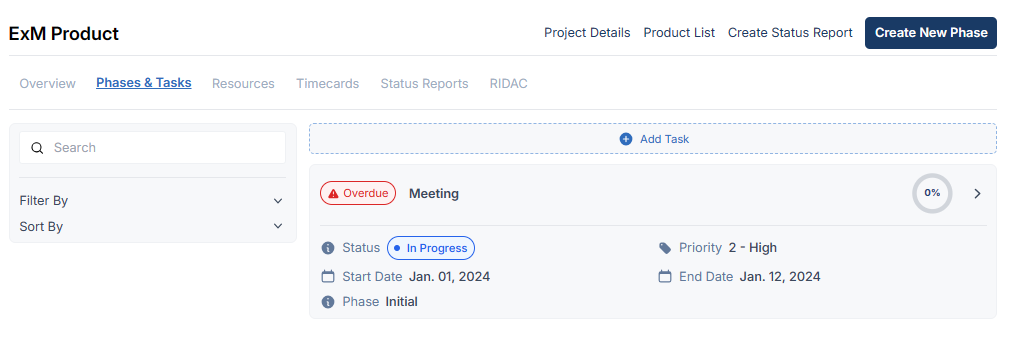
Add Task:
To create a task, navigate to 'Add Task'.
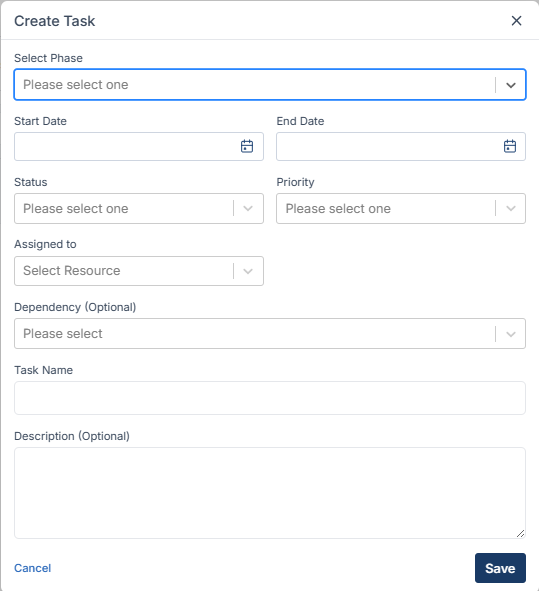
| Fields | Description |
|---|---|
| Select Phase | Identify the phase associated with the task. |
| Start Date | Set a commencement date that falls within the range established by the phase's start and end dates. |
| End Date | Define the conclusion date falling within the range established by the phase's start and end dates. |
| Status | Communicate the current status of the task. |
| Priority | Highlight the priority level. |
| Assigned to | Name the person assigned to the task. |
| Dependency | Indicates the task that is reliant on or linked to another task, creating a dependency between them. |
| Task Name | Specify the task name. |
| Description | Provide details or describe the characteristics of the resource. |
Select Phase, Start Date, End Date, Status, Priority, Assigned To, and Task Name is mandatory, and these fields must be filled.
- Task start date and end date should fall within the phase start and end date.
- Task names must be unique; duplications are not allowed.
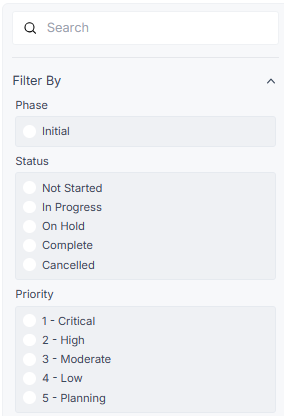
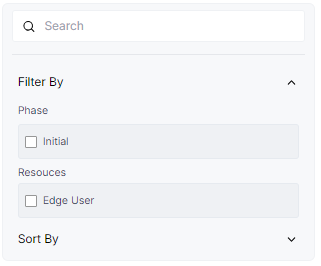
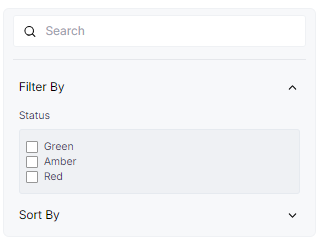
Searching & Filtering
Searching and Filtering is allowed based on the phase, status, and priority
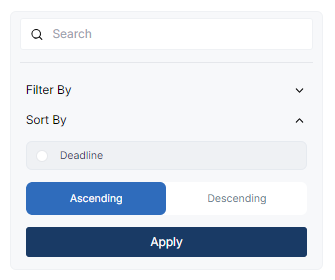
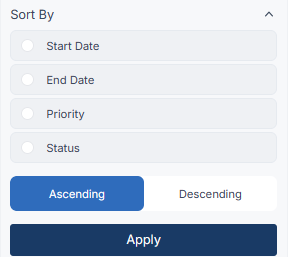
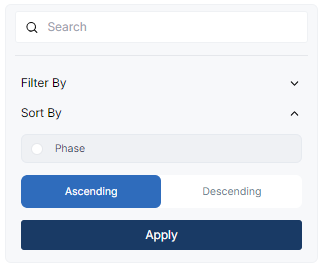
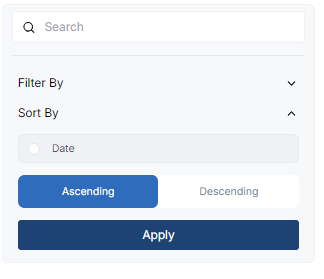
Sort
Sorting can be performed based on start date, end date, priority, and status, in both ascending and descending order.
Resources
In project management, allocation of resources is a critical aspect that involves assigning and distributing various elements to support the successful execution of projects. This allocation process is typically facilitated through the 'Resource' tab within project management tools.
The 'Resource' tab serves as a central hub where project managers and team members can manage and oversee different types of resources required for project activities.
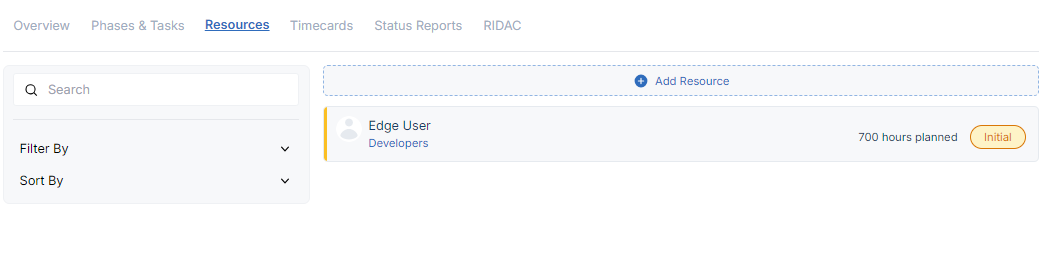
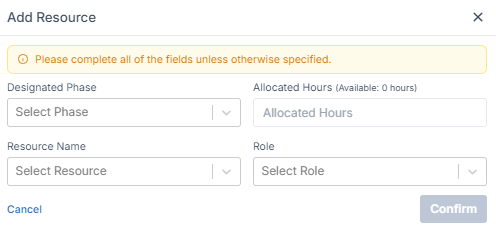
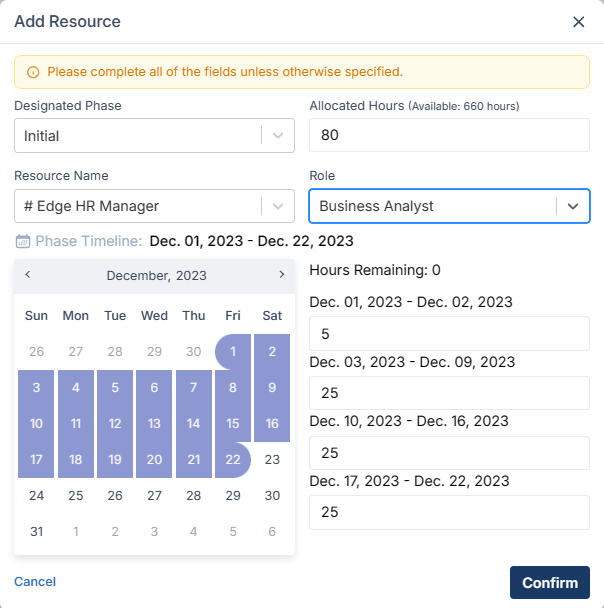
Add Resource
To add a resource, navigate to 'Add Resource'.
| Fields | Description |
|---|---|
| Designated Phase | Allocate phases according to the specified resource allocation. |
| Allocated Hours | Define the assigning hours to a resource. |
| Resource Name | Indicate the name of the resource for which hours need to be allocated. |
| Role | Specify the resource role for the project. |
Resource Allocation Breakdown
Automated distribution of hours in resource allocation is a process where assign work hours to various tasks, projects, or team members. This helps optimize resource utilization, ensures efficiency, and aligns with project priorities. It involves predefined rules, flexibility for adjustments, and often includes reporting features for monitoring and decision-making. The system will show leave details, such as planned time off, holidays, or any other scheduled absences, enabling project managers to make informed decisions about resource allocation while accounting for periods when certain team members may be unavailable.
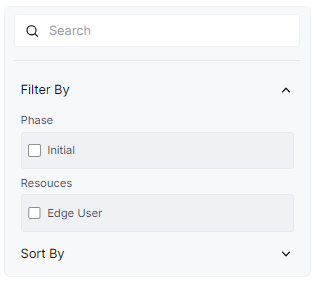
Searching & Filtering
Searching and Filtering is allowed based on the phase and resources.
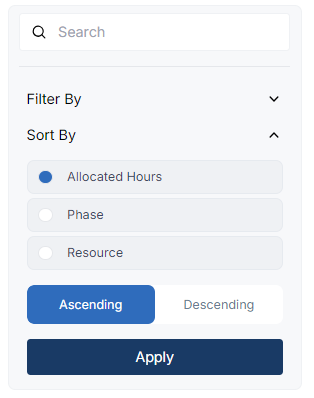
Sorting
Sorting can be performed based on allocation hours, phase and resource, in both ascending and descending order.
Timecard
In the timecard tab, the visibility of timecards is organized based on their connection to specific project phases and allocated resources. This detailed arrangement ensures that timecards are easily accessible and categorized according to the relevant project phase and the team members or resources associated with those phases. By structuring timecards in this manner, resource can efficiently track and manage the time-related data within the context of project phases and resource assignments, providing a comprehensive view of how time is allocated across different aspects of the project.
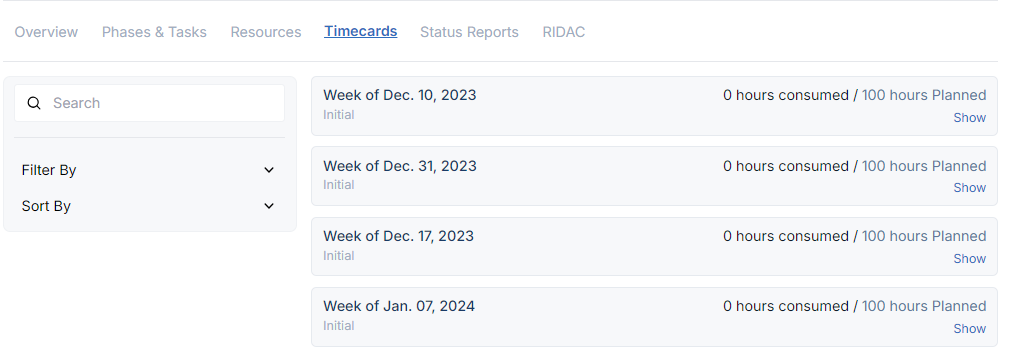
Searching & Filtering
Searching and Filtering is allowed based on the phase and resources.
Sorting
Sorting can be performed based on phase in both ascending and descending order.
Status Report
Status reports that are created will be visible within the "Status Report" tab.
To download and view the status report, click on the  icon
icon
To download the report, simply click on the  button
Project Management Status Chart

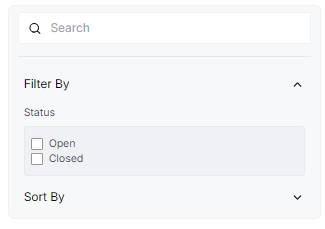
Searching & Filtering
Searching and Filtering is allowed based on the status.
Sorting
Sorting can be performed based on date in both ascending and descending order.
RIDAC
RIDAC in Project Workspace represents various records in project management:
- Risk: Potential events affecting the project.
- Issue: Existing problems impacting the project.
- Decision: Formal decisions made during the project.
- Action: Tasks to address risks, issues, or decisions.
- Request Change: Formal requests to change project aspects.
These categories help organize and manage project-related information efficiently.
To add RIDAC, navigate to 'Add RIDAC'.

A 'Create RIDAC Report' form will appear.
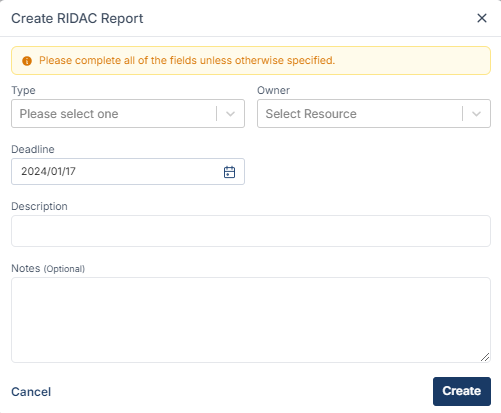
| Fields | Description |
|---|---|
| Type | Select the type of RIDAC report as Risk, Action, or Decision. |
| Owner | Select the owner for the RIDAC |
| Deadline | Select the deadline date for RIDAC. |
| Description | Describe about the RIDAC report in the description. |
| Notes | Notes can also be specified. |
All fields except notes are mandatory and must be filled.
Searching & Filtering
Searching and Filtering is allowed based on the status.
Sorting
Sorting can be performed based on deadline in both ascending and descending order.